|
Removing and Installing your Williams High Score EPROM
Removing your old EPROM and installing a new one is very easy and takes only a couple of minutes and a small, flat head screwdriver.
Before Installing or Removing EPROMs
Be sure to turn off the power, and unplug the power cord from the wall outlet. Static electricity can damage EPROMs. To avoid this, touch some metal part of your game before handling the EPROMs. DO NOT remove EPROMs from the anti-static foam until you're ready to install them.
Removing the original EPROM
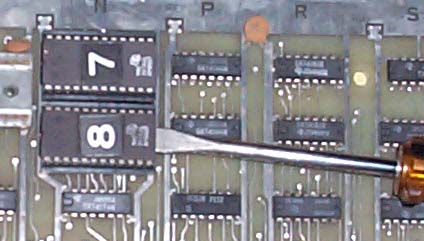
Insert the blade of the screwdriver between the EPROM and the socket, close to one row of pins. Be sure you aren't prying the socket itself. GENTLY twist the screwdriver to lift the row of pins a fraction of an inch, then continue doing this to the other end of the EPROM and keep doing all 4 corners slowly until the EPROM pops out.
Bubbles, Robotron, Splat! and Stargate all replace the EPROM at location 11.
Joust replaces the EPROM at location 5
Shown here is a Williams ROM board in the proper orientation as it would be viewed on an open cabinet door and I've labeled the locations used for the Williams High Score EPROMS applicable to this board.

Installing the new EPROM
Align the chip with the empty socket. Both the chip and the socket have a small notch on one end; align the chip so that its notch matches up with the notch on the socket. If you have problems finding the notch on the socket, just make sure that the notch on the chip to be inserted faces the same direction as the notches on the other chips near the chip(s) being inserted.
Before installing a chip, verify that its pins match up with the holes in the socket. If they don't, align the pins by laying the chip on its side on a table and gently pressing its top edge of the EPROM (not the pins) so as to bend the pins only slightly inwards. Repeat for the other row of pins if necessary. DO NOT use excessive force while doing this or you may damage the eprom by breaking legs off. When you are sure the pins are aligned correctly, press firmly and evenly on the chip to seat the pins in the socket.
Carefully examine the pins of the chip and look for any pins that are bent under or out. If you find bent pins, remove the chip, gently straighten them, and restart the chip installation procedures again.
If you have any questions with this procedure it is always better to email me first.
|


